Run Cluster via JSON Config
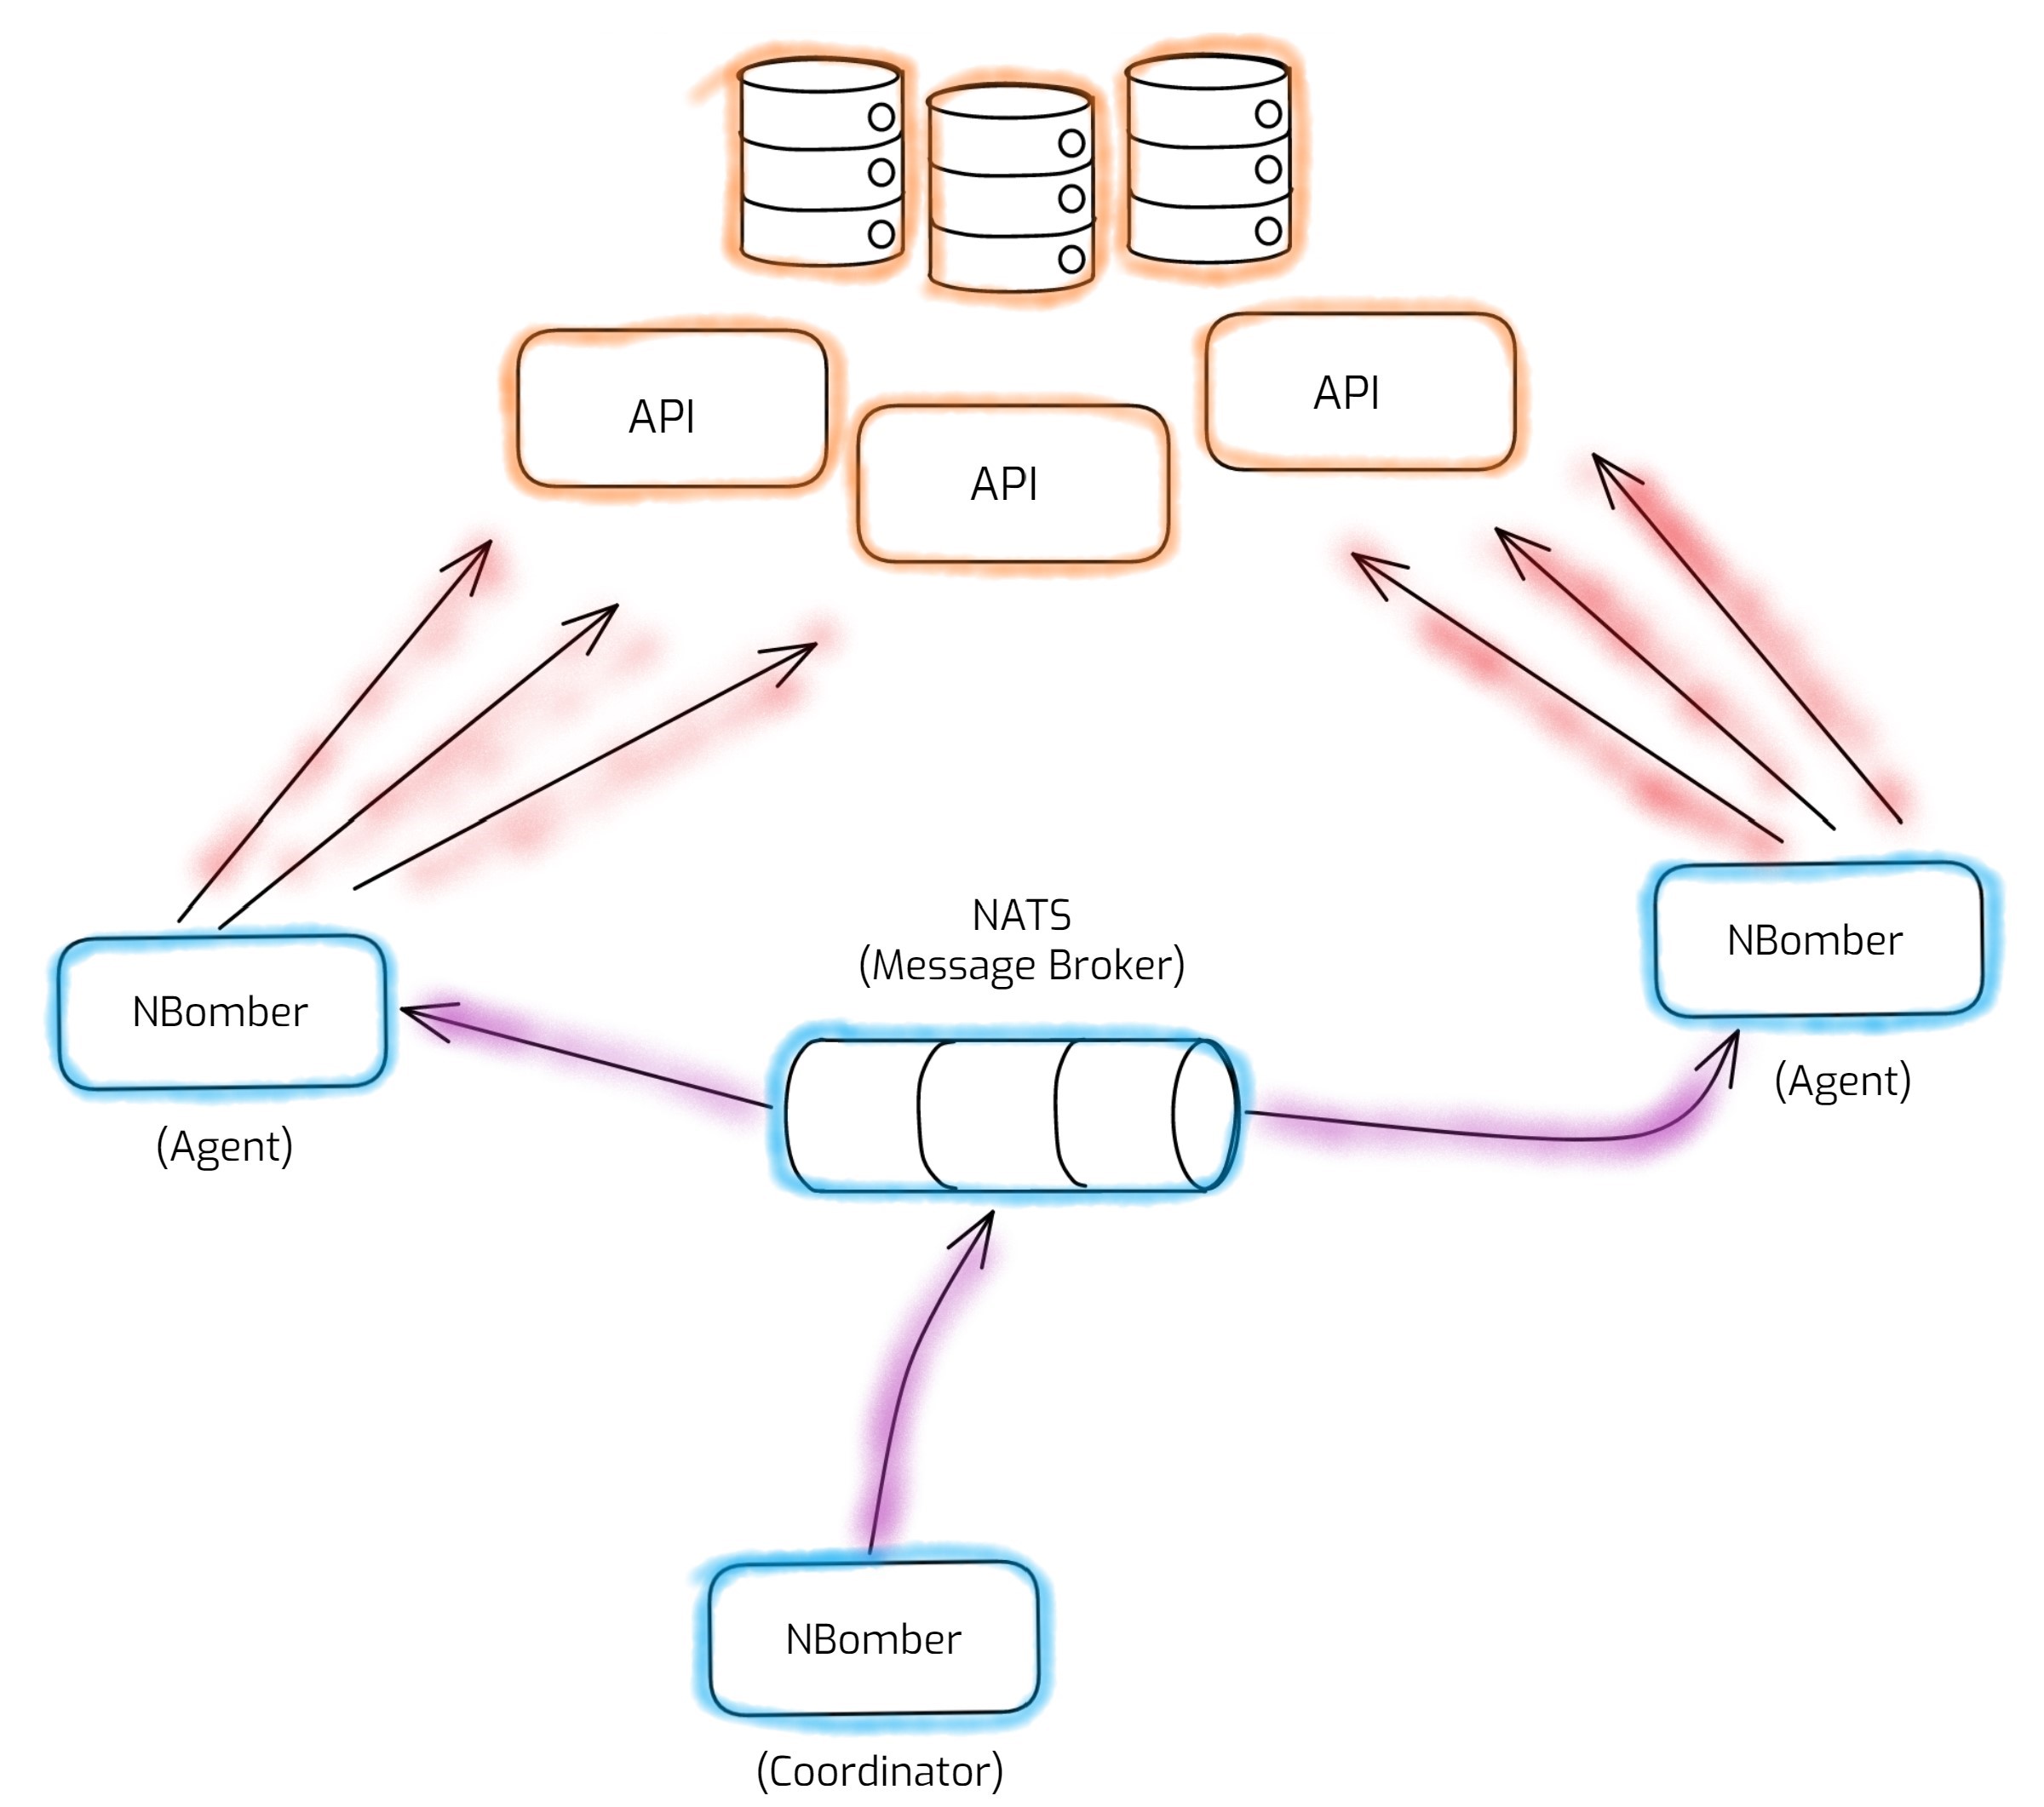
New to cluster mode? See the Overview for the Coordinator, Agent, and Message Broker roles before continuing.
Forming and running a cluster via JSON Config provides an additional level of flexibility. With this option you can control scenario placement in the cluster. Additionally, for some users it's more natural and convenient to define settings in a JSON config. You can also combine JSON Config and CLI Args to override some of the settings.
Basic config
For a simple setup, the JSON config contains an AutoCluster section. With this config, the Coordinator is chosen automatically via leader election — you don't assign roles manually. It's the recommended starting point since it fits the majority of load tests.
This is a basic example for a cluster with two nodes (Coordinator + 1 Agent). In the follwoing example the Coordinator runs no scenarios and acts purely as an orchestrator (collecting metrics from all Agents and evaluating thresholds), while the Agents run the load. This is the recommended default, since an idle Coordinator won't distort your results. If you do want the Coordinator to run scenarios, see Running scenarios on the Coordinator below.
{
    "TestSuite": "my test suite",
    "TestName": "my test",

    "ClusterSettings": {

        "AutoCluster": {
            "ClusterId": "test_cluster",
            "NATSServerURL": "nats://localhost",

            "Agent": {
                "TargetScenarios": ["test_scenario"],
                "AgentsCount": 1
            }
        }

    }
}
The main settings are:
- ClusterId - think of this as a virtual cluster id for cluster members. Cluster members use this
ClusterIdto discover each other. Usually you can just keep the value asClusterId=default— it only needs to be unique if you're running multiple concurrent cluster sessions against the same shared NATS instance. See Message Broker for details and an example. - NATSServerURL - the URL of the NATS message broker. In our example, we use
localhostsince we host NATS on the local machine usingdocker-compose. You can find more info about NATS connection strings here. - TargetScenarios - specifies target scenarios that will be executed in the cluster. Here we set it only for the Agents; configuring target scenarios for the Coordinator is covered in Running scenarios on the Coordinator.
- AgentsCount - the number of Agents that will join the cluster with the specified
ClusterId. In this case, the cluster will consist of 1 Agent. We don't specify the number of Coordinators since there is always exactly 1. So the total cluster size is 2 members: 1 Coordinator + 1 Agent.
You can also combine the cluster settings with GlobalSettings (for example, to define ScenariosSettings or a ReportingInterval):
{
    "TestSuite": "my test suite",
    "TestName": "my test",

    "ClusterSettings": {

        "AutoCluster": {
            "ClusterId": "test_cluster",
            "NATSServerURL": "nats://localhost",

            "Agent": {
                "TargetScenarios": ["test_scenario"],
                "AgentsCount": 1
            }
        }

    },

    "GlobalSettings": {

        "ScenariosSettings": [
            {
                "ScenarioName": "test_scenario",
                "LoadSimulationsSettings": [{ "Inject": [1, "00:00:01", "00:00:01"] }]
            }
        ],

        "ReportingInterval": "00:00:05"
    }
}
Run the cluster
Let's assume we already have a Scenario named "test_scenario" that we want to run in the cluster. All we need to do is load the cluster configuration and run it.
var scenario = Scenario.Create("test_scenario", async context => { ... });

NBomberRunner
    .RegisterScenarios(scenario)
    .LoadConfig("autocluster-config.json")
    .License("YOUR_ENTERPRISE_LICENSE_KEY")
    .Run();
You can find the complete example by this link.
Run via CLI args
MyLoadTest.dll --config="autocluster-config.json"
You can also pass other CLI args to override config settings:
MyLoadTest.dll --config="autocluster-config.json" --cluster-agents-count=5 --license=YOUR_LICENSE_KEY
Here, you can find a list of all available CLI arguments.
Advanced scenario placement (AgentGroups)
If you need to place specific scenarios on specific groups of nodes (for example, run CreateUser on one set of Agents and ReadUser on another), you can't express that with plain CLI args — this is exactly what the ManualCluster config below is for. Note that the --cluster-node-type and --cluster-agent-group CLI args only come into play together with a ManualCluster config; they are not used for a plain CLI cluster run.
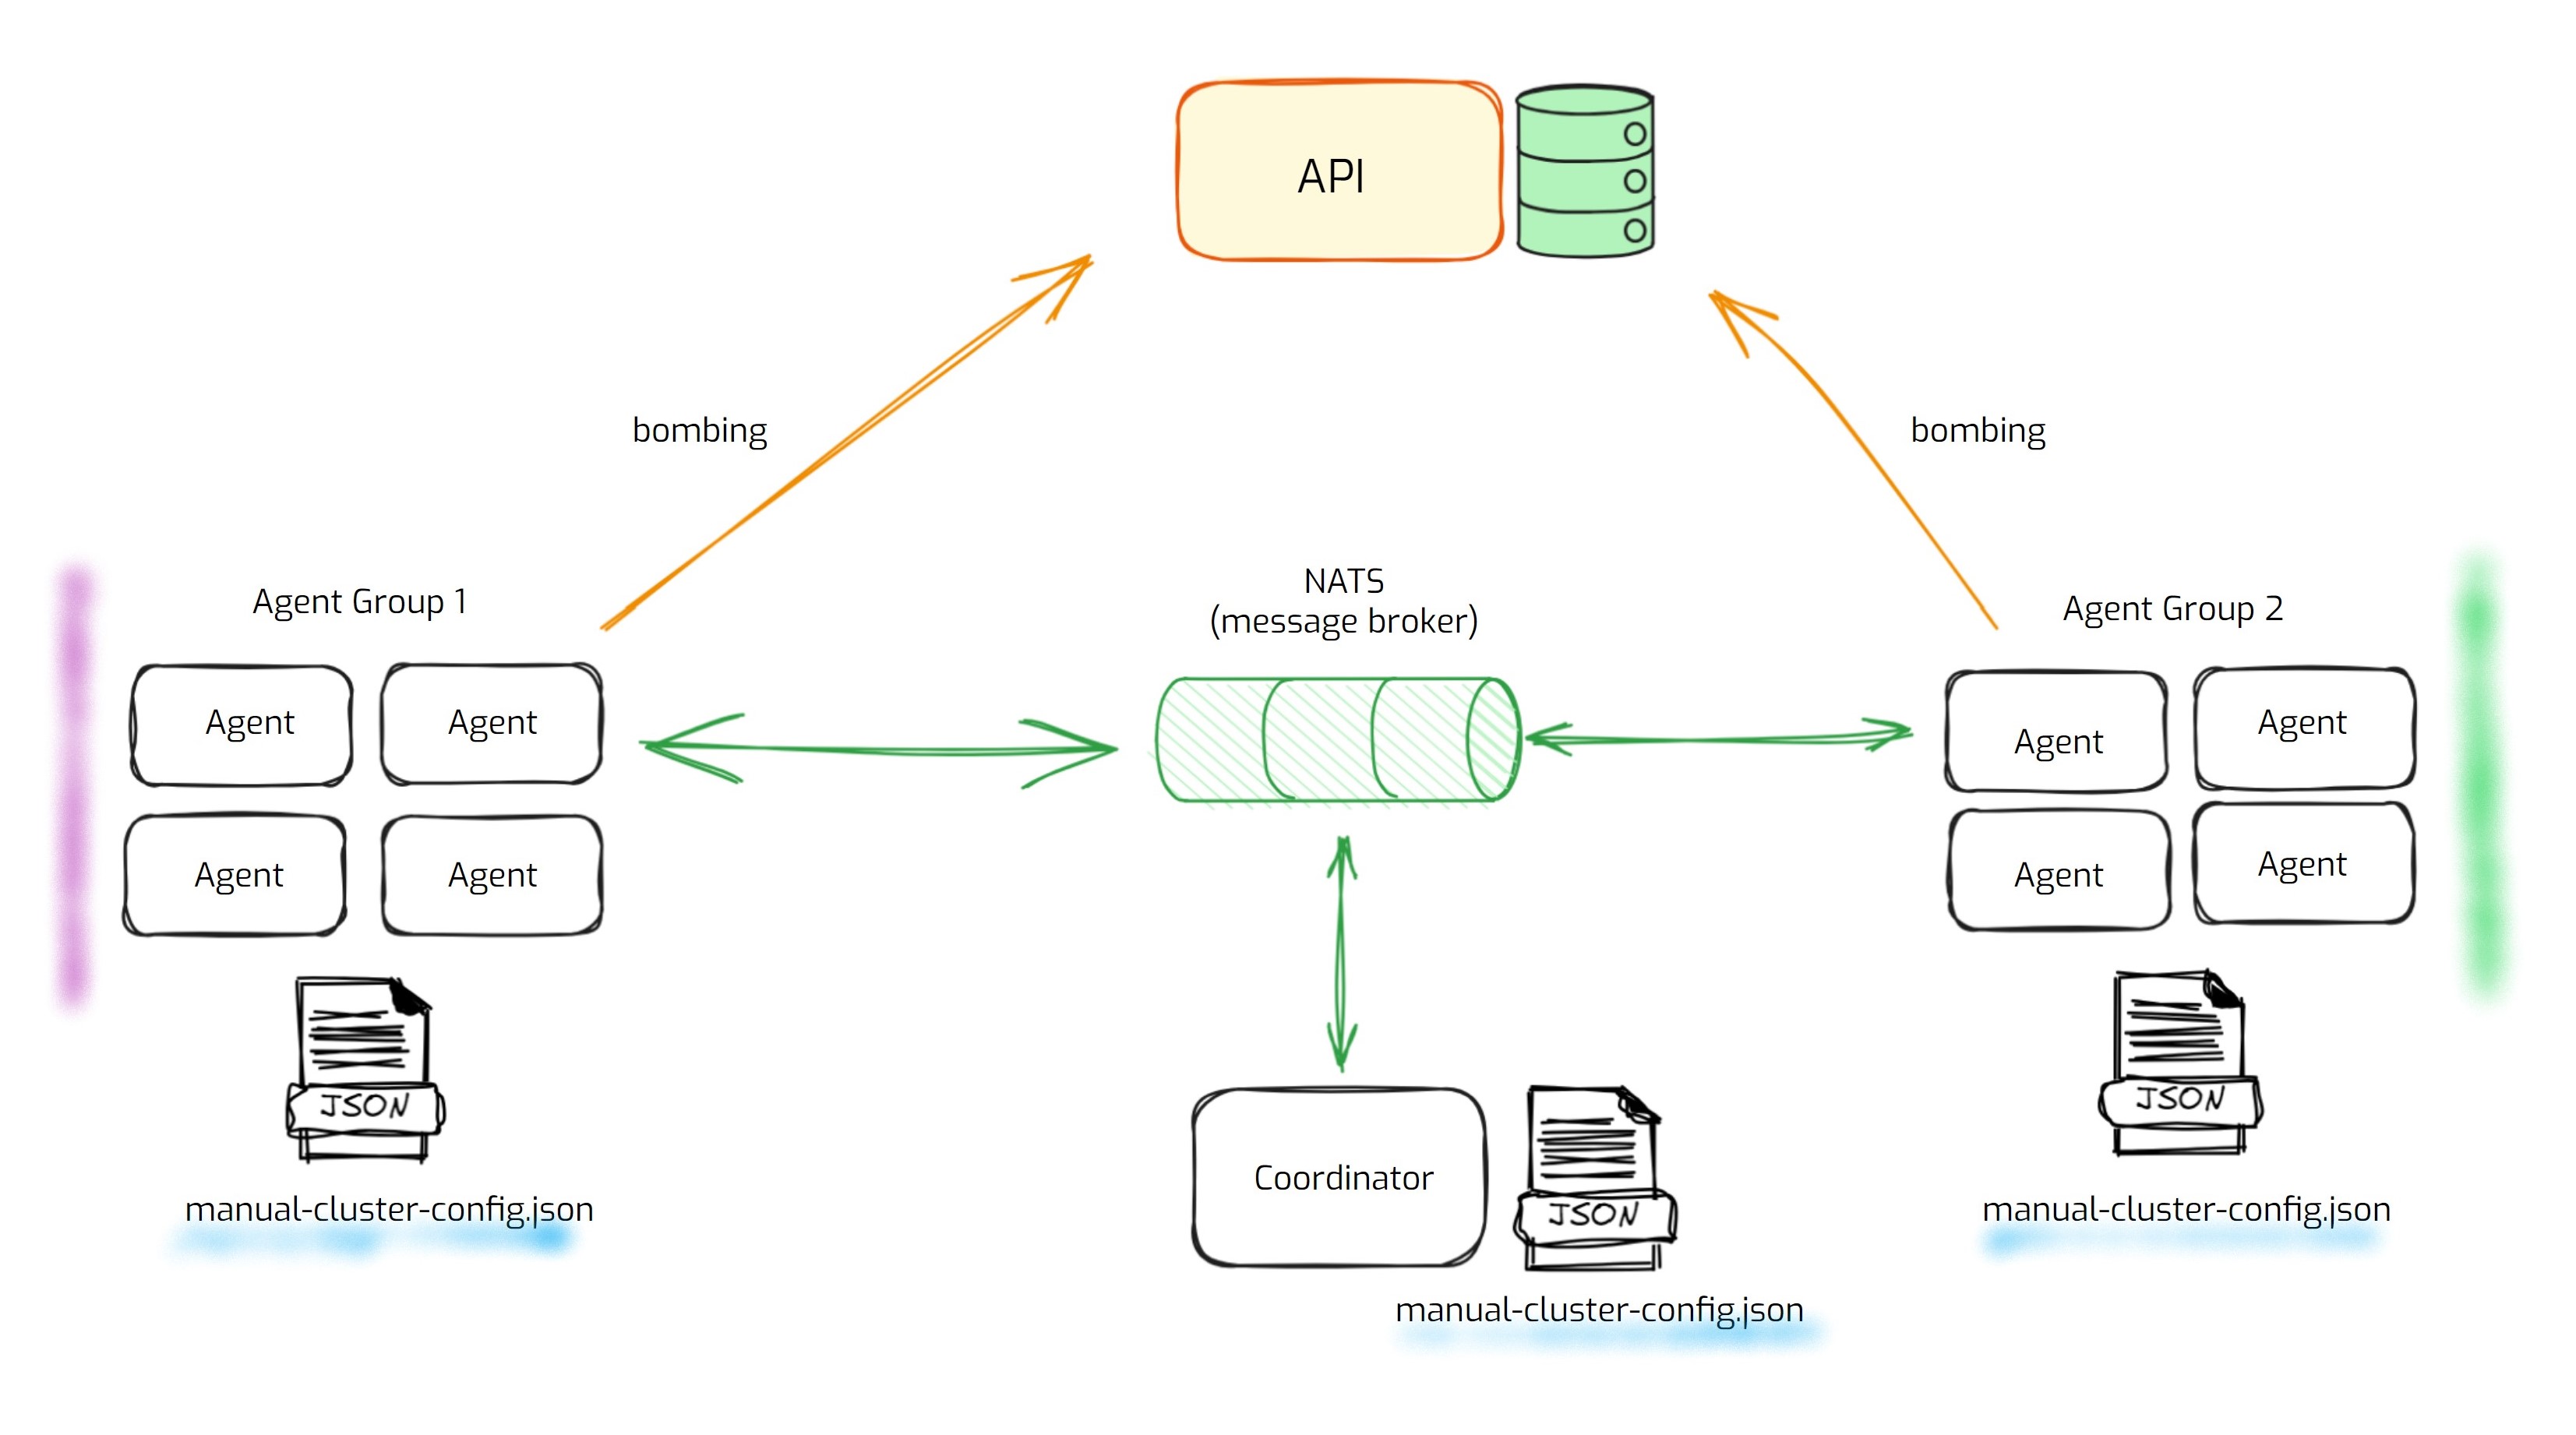
When you need granular control over where each scenario runs, use a ManualCluster section instead of AutoCluster. With this config you can deploy different types of scenarios on different sets of nodes — you specify placement for each scenario in the cluster (via AgentGroups), and the Coordinator and Agents are assigned manually on startup via code or CLI arguments.
For example, you want to test a web service by running the CreateUser scenario on one group of nodes, the ReadUser scenario on a second group, and periodically run SaveUser on a third group. This is a perfect use case for a ManualCluster config since it lets you deploy different scenarios on different sets of nodes.
The config looks similar to the basic config above, except it contains "ManualCluster" instead of "AutoCluster" and adds the AgentGroups settings:
{
    "TestSuite": "my test suite",
    "TestName": "my test",

    "ClusterSettings": {

        "ManualCluster": {
            "ClusterId": "test_cluster",
            "NATSServerURL": "nats://localhost",

            "Agent": {
                "AgentGroups": [{ "AgentGroup": "1", "TargetScenarios": ["test_scenario"] }],
                "AgentsCount": 1
            }
        }

    }
}
In addition to the basic settings, this config adds:
- AgentGroups - the list of AgentGroups, where each group contains the target scenarios for the Agents assigned to that group.
Agent and AgentGroup
Agent is a cluster role responsible for running load test scenarios and reacting to the commands from the Coordinator. AgentGroup represents a virtual group for the Agent node type. This group contains the TargetScenarios that will be executed on the Agents under this group.
"Agent": {
    "AgentGroups": [
        { "AgentGroup": "1", "TargetScenarios": ["scenario_1"] },
        { "AgentGroup": "2", "TargetScenarios": ["scenario_2"] },
        { "AgentGroup": "my_group", "TargetScenarios": ["scenario_3"] }
    ],
    "AgentsCount": 1
}
Run Agent
To start an NBomber process as an Agent you should specify --cluster-node-type=agent and the agent group --cluster-agent-group={group_name}:
MyLoadTest.dll --config="manualcluster-config.json" --cluster-node-type=agent --cluster-agent-group=1 --license=YOUR_LICENSE_KEY
By executing this command the NBomber process will start as an Agent under: "AgentGroup": "1", "TargetScenarios": ["scenario_1"].
Here, you can find a list of all available CLI arguments.
Also, you can start an Agent via code:
var scenario1 = Scenario.Create("scenario_1", async context => { ... });
var scenario2 = Scenario.Create("scenario_2", async context => { ... });
var scenario3 = Scenario.Create("scenario_3", async context => { ... });

NBomberRunner
    .RegisterScenarios(scenario1, scenario2, scenario3)
    .LoadConfig("manualcluster-config.json")
    .WithAgentGroup("my_group")
    .WithNodeType(NodeType.Agent)
    .Run(args);
Run Coordinator
The Coordinator is the cluster role responsible for coordinating the execution of the entire test: scenario warm-up/start/stop/placement, fetching all metrics from Agent(s), etc.
Only one instance of Coordinator is allowed per cluster.
To start an NBomber process as the Coordinator you should specify --cluster-node-type=coordinator:
MyLoadTest.dll --config="manualcluster-config.json" --cluster-node-type=coordinator --license=YOUR_LICENSE_KEY
Here, you can find a list of all available CLI arguments.
Also, you can start the Coordinator via code:
var scenario1 = Scenario.Create("scenario_1", async context => { ... });
var scenario2 = Scenario.Create("scenario_2", async context => { ... });
var scenario3 = Scenario.Create("scenario_3", async context => { ... });

NBomberRunner
    .RegisterScenarios(scenario1, scenario2, scenario3)
    .LoadConfig("manualcluster-config.json")
    .WithNodeType(NodeType.Coordinator)
    .WithAgentsCount(50)
    .Run(args);
Running scenarios on the Coordinator
So far, none of the configs above included a Coordinator section — by default the Coordinator runs no scenarios and acts purely as an orchestrator (collecting metrics from all Agents and evaluating thresholds), while the Agents run the load. If you want the Coordinator to also run scenarios, add a Coordinator section with its TargetScenarios.
For an AutoCluster config:
{
    "TestSuite": "my test suite",
    "TestName": "my test",

    "ClusterSettings": {

        "AutoCluster": {
            "ClusterId": "test_cluster",
            "NATSServerURL": "nats://localhost",

            "Coordinator": {
                "TargetScenarios": ["test_scenario"]
            },

            "Agent": {
                "TargetScenarios": ["test_scenario"],
                "AgentsCount": 1
            }
        }

    }
}
The same works for a ManualCluster config — add the Coordinator section alongside the AgentGroups:
{
    "TestSuite": "my test suite",
    "TestName": "my test",

    "ClusterSettings": {

        "ManualCluster": {
            "ClusterId": "test_cluster",
            "NATSServerURL": "nats://localhost",

            "Coordinator": {
                "TargetScenarios": ["test_scenario"]
            },

            "Agent": {
                "AgentGroups": [{ "AgentGroup": "1", "TargetScenarios": ["test_scenario"] }],
                "AgentsCount": 1
            }
        }

    }
}
Be very cautious about scheduling scenarios on the Coordinator. The Coordinator orchestrates the entire test — it aggregates metrics from all Agents and evaluates thresholds — so running heavy load on it can distort your load test results. Prefer keeping it idle (omit the Coordinator section) and run scenarios only on the Agents. Running scenarios on the Coordinator makes sense only for lightweight, singleton work that must run exactly once in the cluster (for example, periodically writing a message to Kafka).
If you add a Coordinator section but omit its TargetScenarios, the Coordinator falls back to running all registered scenarios:
{
    "ClusterSettings": {

        "AutoCluster": {
            "ClusterId": "test_cluster",
            "NATSServerURL": "nats://localhost",

            "Coordinator": {
                // TargetScenarios omitted -> Coordinator runs all registered scenarios
            },

            "Agent": {
                "TargetScenarios": ["test_scenario"],
                "AgentsCount": 1
            }
        }

    }
}
To keep the Coordinator idle, either omit the whole Coordinator section or set "TargetScenarios": []:
{
    "ClusterSettings": {

        "AutoCluster": {
            "ClusterId": "test_cluster",
            "NATSServerURL": "nats://localhost",

            "Coordinator": {
                "TargetScenarios": []
            },

            "Agent": {
                "TargetScenarios": ["test_scenario"],
                "AgentsCount": 1
            }
        }

    }
}
This is the JSON Config equivalent of the CLI pattern --cluster-coordinator-target=[].
Run Local Dev Cluster
If you don't have an enterprise license key but want to try NBomber Cluster, you can run it in development mode via Local Dev Cluster.