Deploy to Kubernetes

Overview
This document will guide you through the process of deploying an NBomber load test on Kubernetes.
First, let's clarify what it means to deploy NBomber in Kubernetes. Since NBomber is a library for your C# or F# application, "deploying NBomber in Kubernetes" involves two main steps:
- Containerizing your NBomber test project via Docker — packaging it into an image.
- Running that image in Kubernetes, either as a single-node Pod or a distributed cluster.
In this document, we will focus on the following steps:
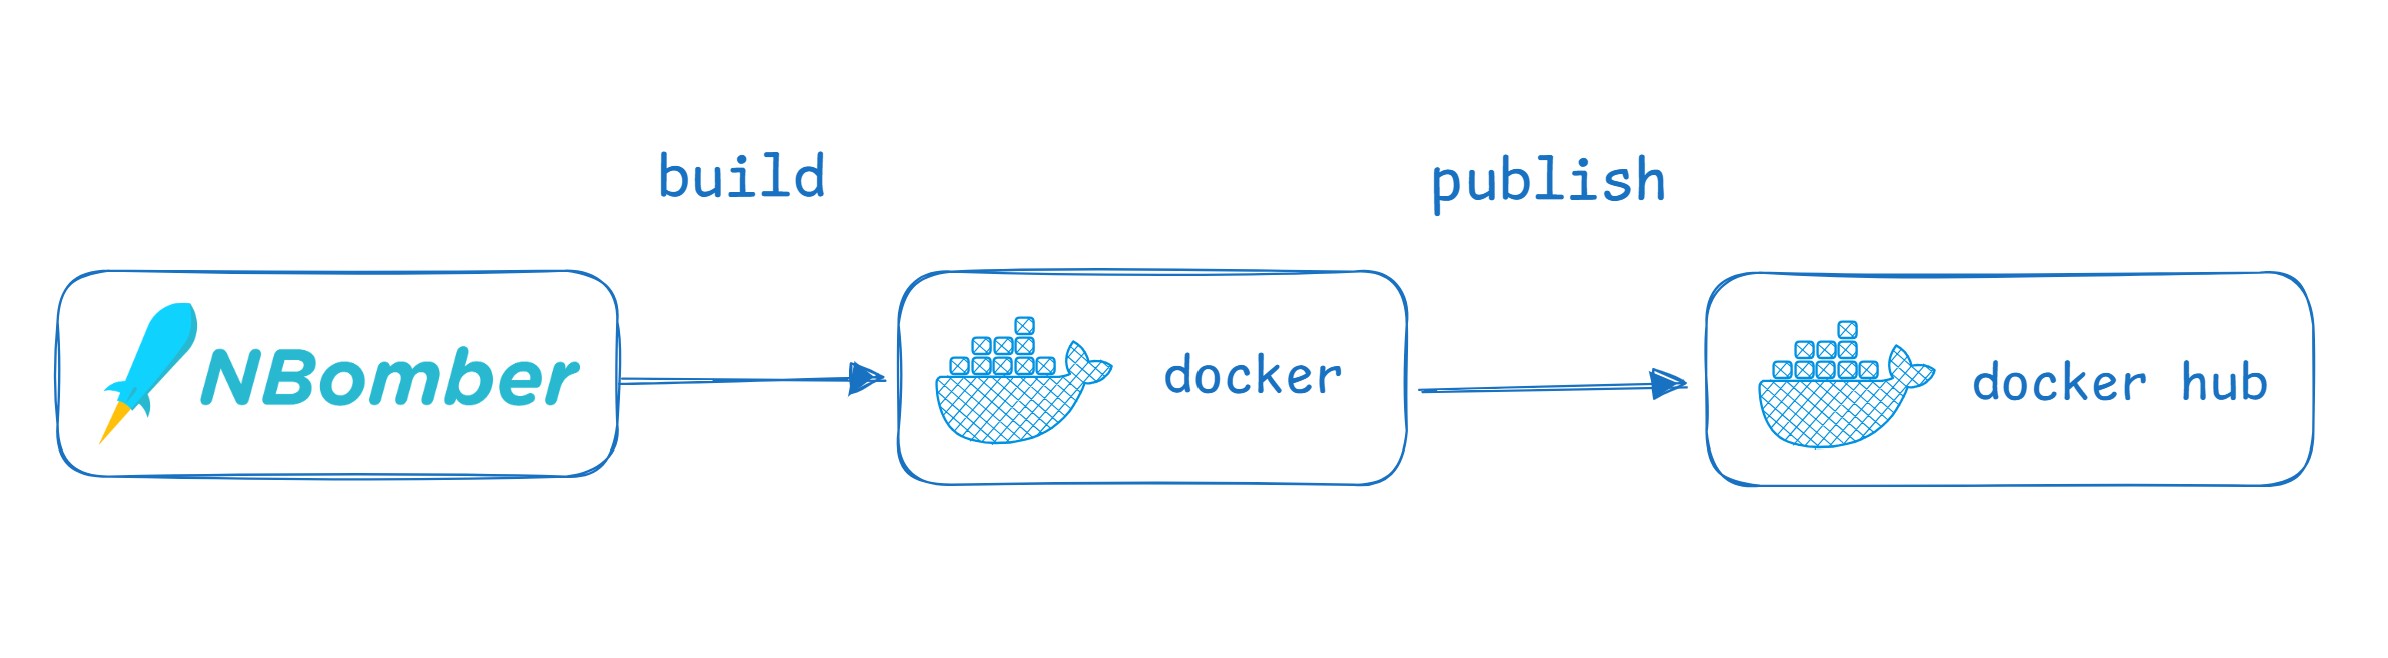
Building Docker image
For this, we created a simple C# console application called K8sDemo, which contains an NBomber HTTP scenario that performs basic endpoint testing.
var httpClient = Http.CreateDefaultClient();

var scenario = Scenario.Create("my_scenario", async context =>
{
    var request = Http.CreateRequest("GET", "https://catfact.ninja/facts");

    var response = await Http.Send(httpClient, request);

    return response;
});
Let’s clone the NBomber Git repository and build a K8sDemo image, which we can then deploy in Kubernetes.
git clone https://github.com/PragmaticFlow/NBomber.git

# move into the root folder
cd NBomber

docker build -f examples/K8sDemo/Dockerfile -t k8sdemo:latest .
Let's now publish the image to DockerHub
docker tag k8sdemo:latest {user_name}/k8sdemo:latest
docker push {user_name}/k8sdemo:latest
In all the following examples, we will use the Docker image nbomberdocker/k8sdemo, which we built specifically for this demo.
Single-Node Deployment
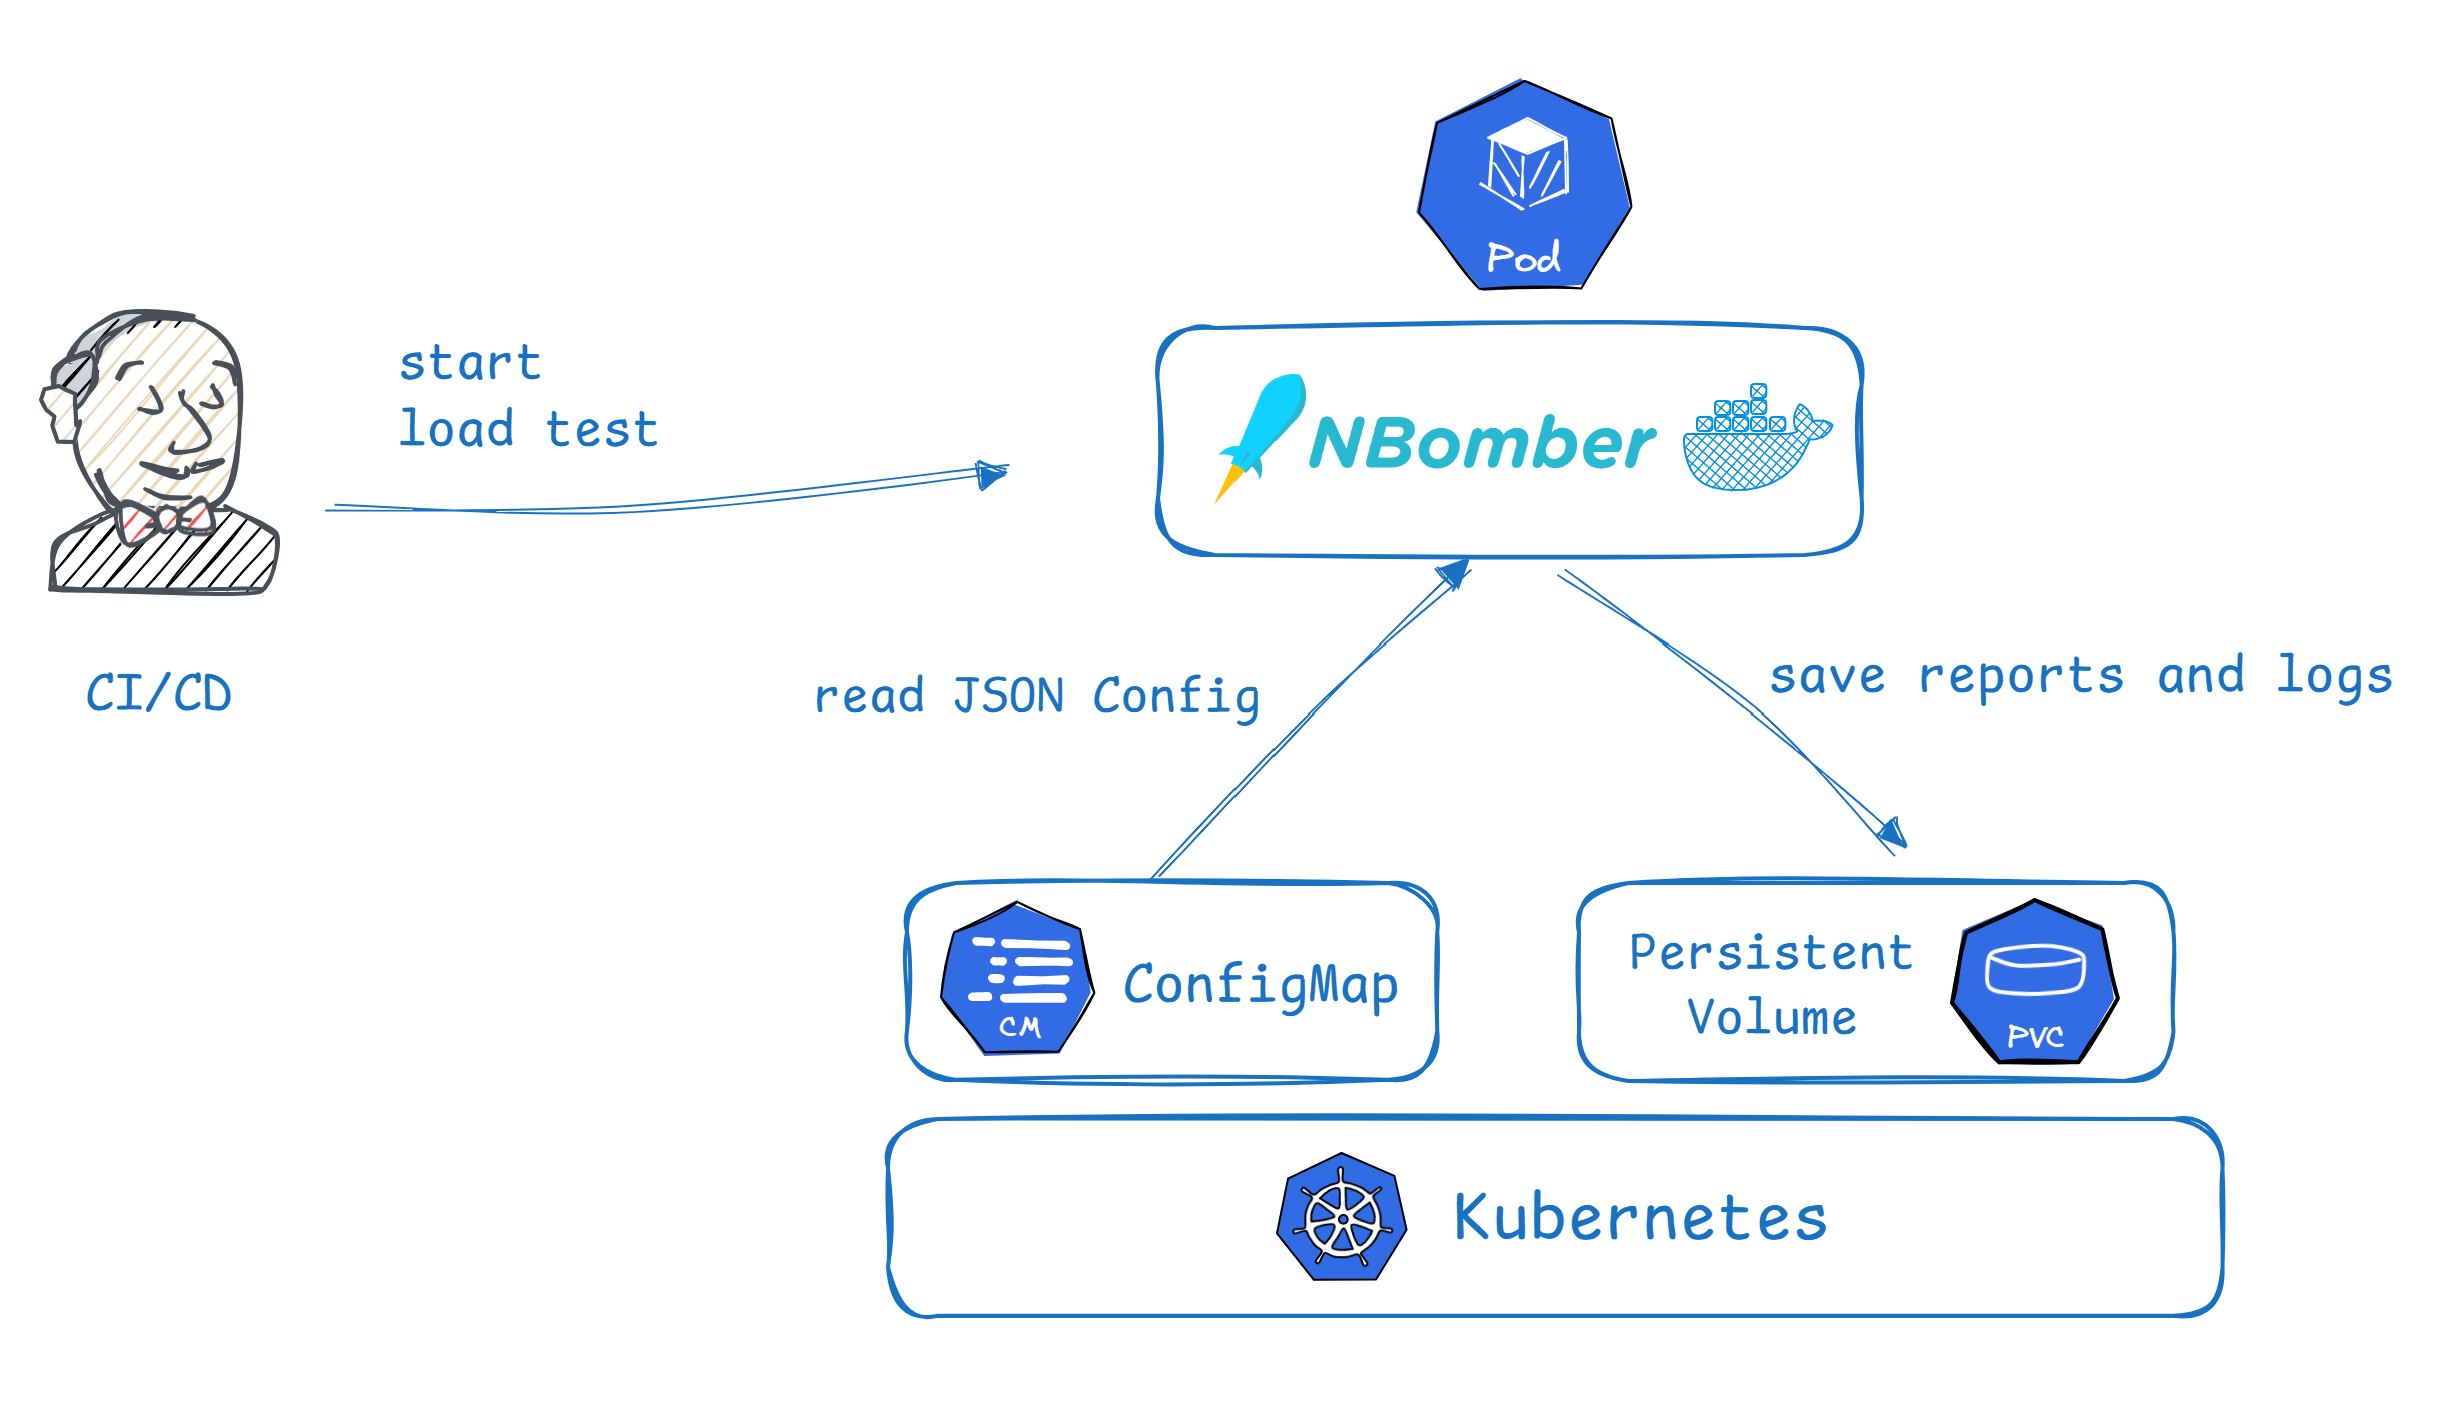
Let’s start with a simple example by running our K8sDemo image in Kubernetes. At this point, we already have our C# HTTP load test containerized as a Docker image.
1. NBomber K8sDemo Pod
Now, let’s create k8sdemo-pod from k8sdemo:latest image.
apiVersion: v1
kind: Pod
metadata:
  name: k8sdemo-pod
  namespace: nbomber-tests
spec:
  containers:
    - name: k8sdemo
      image: nbomberdocker/k8sdemo:latest
      args: ["--config", "/config/nb-config.json"]
      volumeMounts:
        - name: config-volume
          mountPath: /config
          readOnly: true
        - name: reports-volume
          mountPath: /app/my_reports

  restartPolicy: Never

  volumes:
    - name: config-volume
      configMap:
        name: k8sdemo-config
    - name: reports-volume
      persistentVolumeClaim:
        claimName: k8sdemo-pvc
2. ConfigMap with JSON Config for NBomber
An important detail for configuring an NBomber test (especially in cluster mode which we will cover later), is the JSON Config, which we will mount via a ConfigMap. This allows us to override test settings (without recompliation the code) such as scenario duration, load simulation parameters, reports output folder, and more.
apiVersion: v1
kind: ConfigMap
metadata:
    name: k8sdemo-config
    namespace: nbomber-tests
data:
    nb-config.json: |
        {
            "TestSuite": "my-test-suite",
            "TestName": "k8sdemo-test",

            "GlobalSettings": {

                "ScenariosSettings": [
                    {
                        "ScenarioName": "my_scenario",
                        "WarmUpDuration": "00:00:03",

                        "LoadSimulationsSettings": [
                            { "Inject": [5, "00:00:01", "00:00:20"] }
                        ]
                    }
                ],

                "ReportFileName": "my_report_name",
                "ReportFolder": "my_reports"
            }
        }
3. PersistentVolume for reports and logs
We will use PersistentVolume for storing NBomber reports and file logs.
apiVersion: v1
kind: PersistentVolumeClaim
metadata:
  name: k8sdemo-pvc
  namespace: nbomber-tests
spec:
  accessModes:
    - ReadWriteOnce
  resources:
    requests:
      storage: 100Mi
4. Start Load Test
All the previously mentioned code is combined in the k8sdemo-single-node.yaml manifest, which spins up the test along with its dependencies. Let’s start the test by applying this manifest:
kubectl apply -f k8sdemo-single-node.yaml
The k8sdemo Pod should now be created, and the load test should start. We can wait on Pod compleation via command:
kubectl wait --for=condition=Ready=False pod/k8sdemo-pod -n nbomber-tests --timeout=300s
5. Extract reports and logs
Once the container status changes to Succeeded (indicating that the test has finished), we can copy the reports from the /app/my_reports folder.
The report folder path shown above was configured in the JSON config, which we provided via the ConfigMap.
{
    "ReportFileName": "my_report_name",
    "ReportFolder": "my_reports"
}
Since the container has already terminated, we can’t connect to it via shell to copy the reports directly.
The standard approach in this case is to temporarily run an additional empty Pod and attach to it the same PersistentVolume that was previously mounted to the k8sdemo-pod. This allows us to copy the reports from the temporary Pod.
For this, we created an additional k8sdemo-reports-pod.yaml manifest that defines an empty Pod with the PersistentVolume attached. Let’s apply it:
kubectl apply -f k8sdemo-reports-pod.yaml
Afterward, we can connect to the newly created k8sdemo-reports-pod and copy the reports from it:
kubectl cp nbomber-tests/k8sdemo-reports-pod:/app/my_reports ./collected_reports
6. Clean up resources
Finally, don’t forget to clean up the resources:
kubectl delete -f k8sdemo-reports-pod.yaml
kubectl delete -f k8sdemo-single-node.yaml
Cluster Deployment
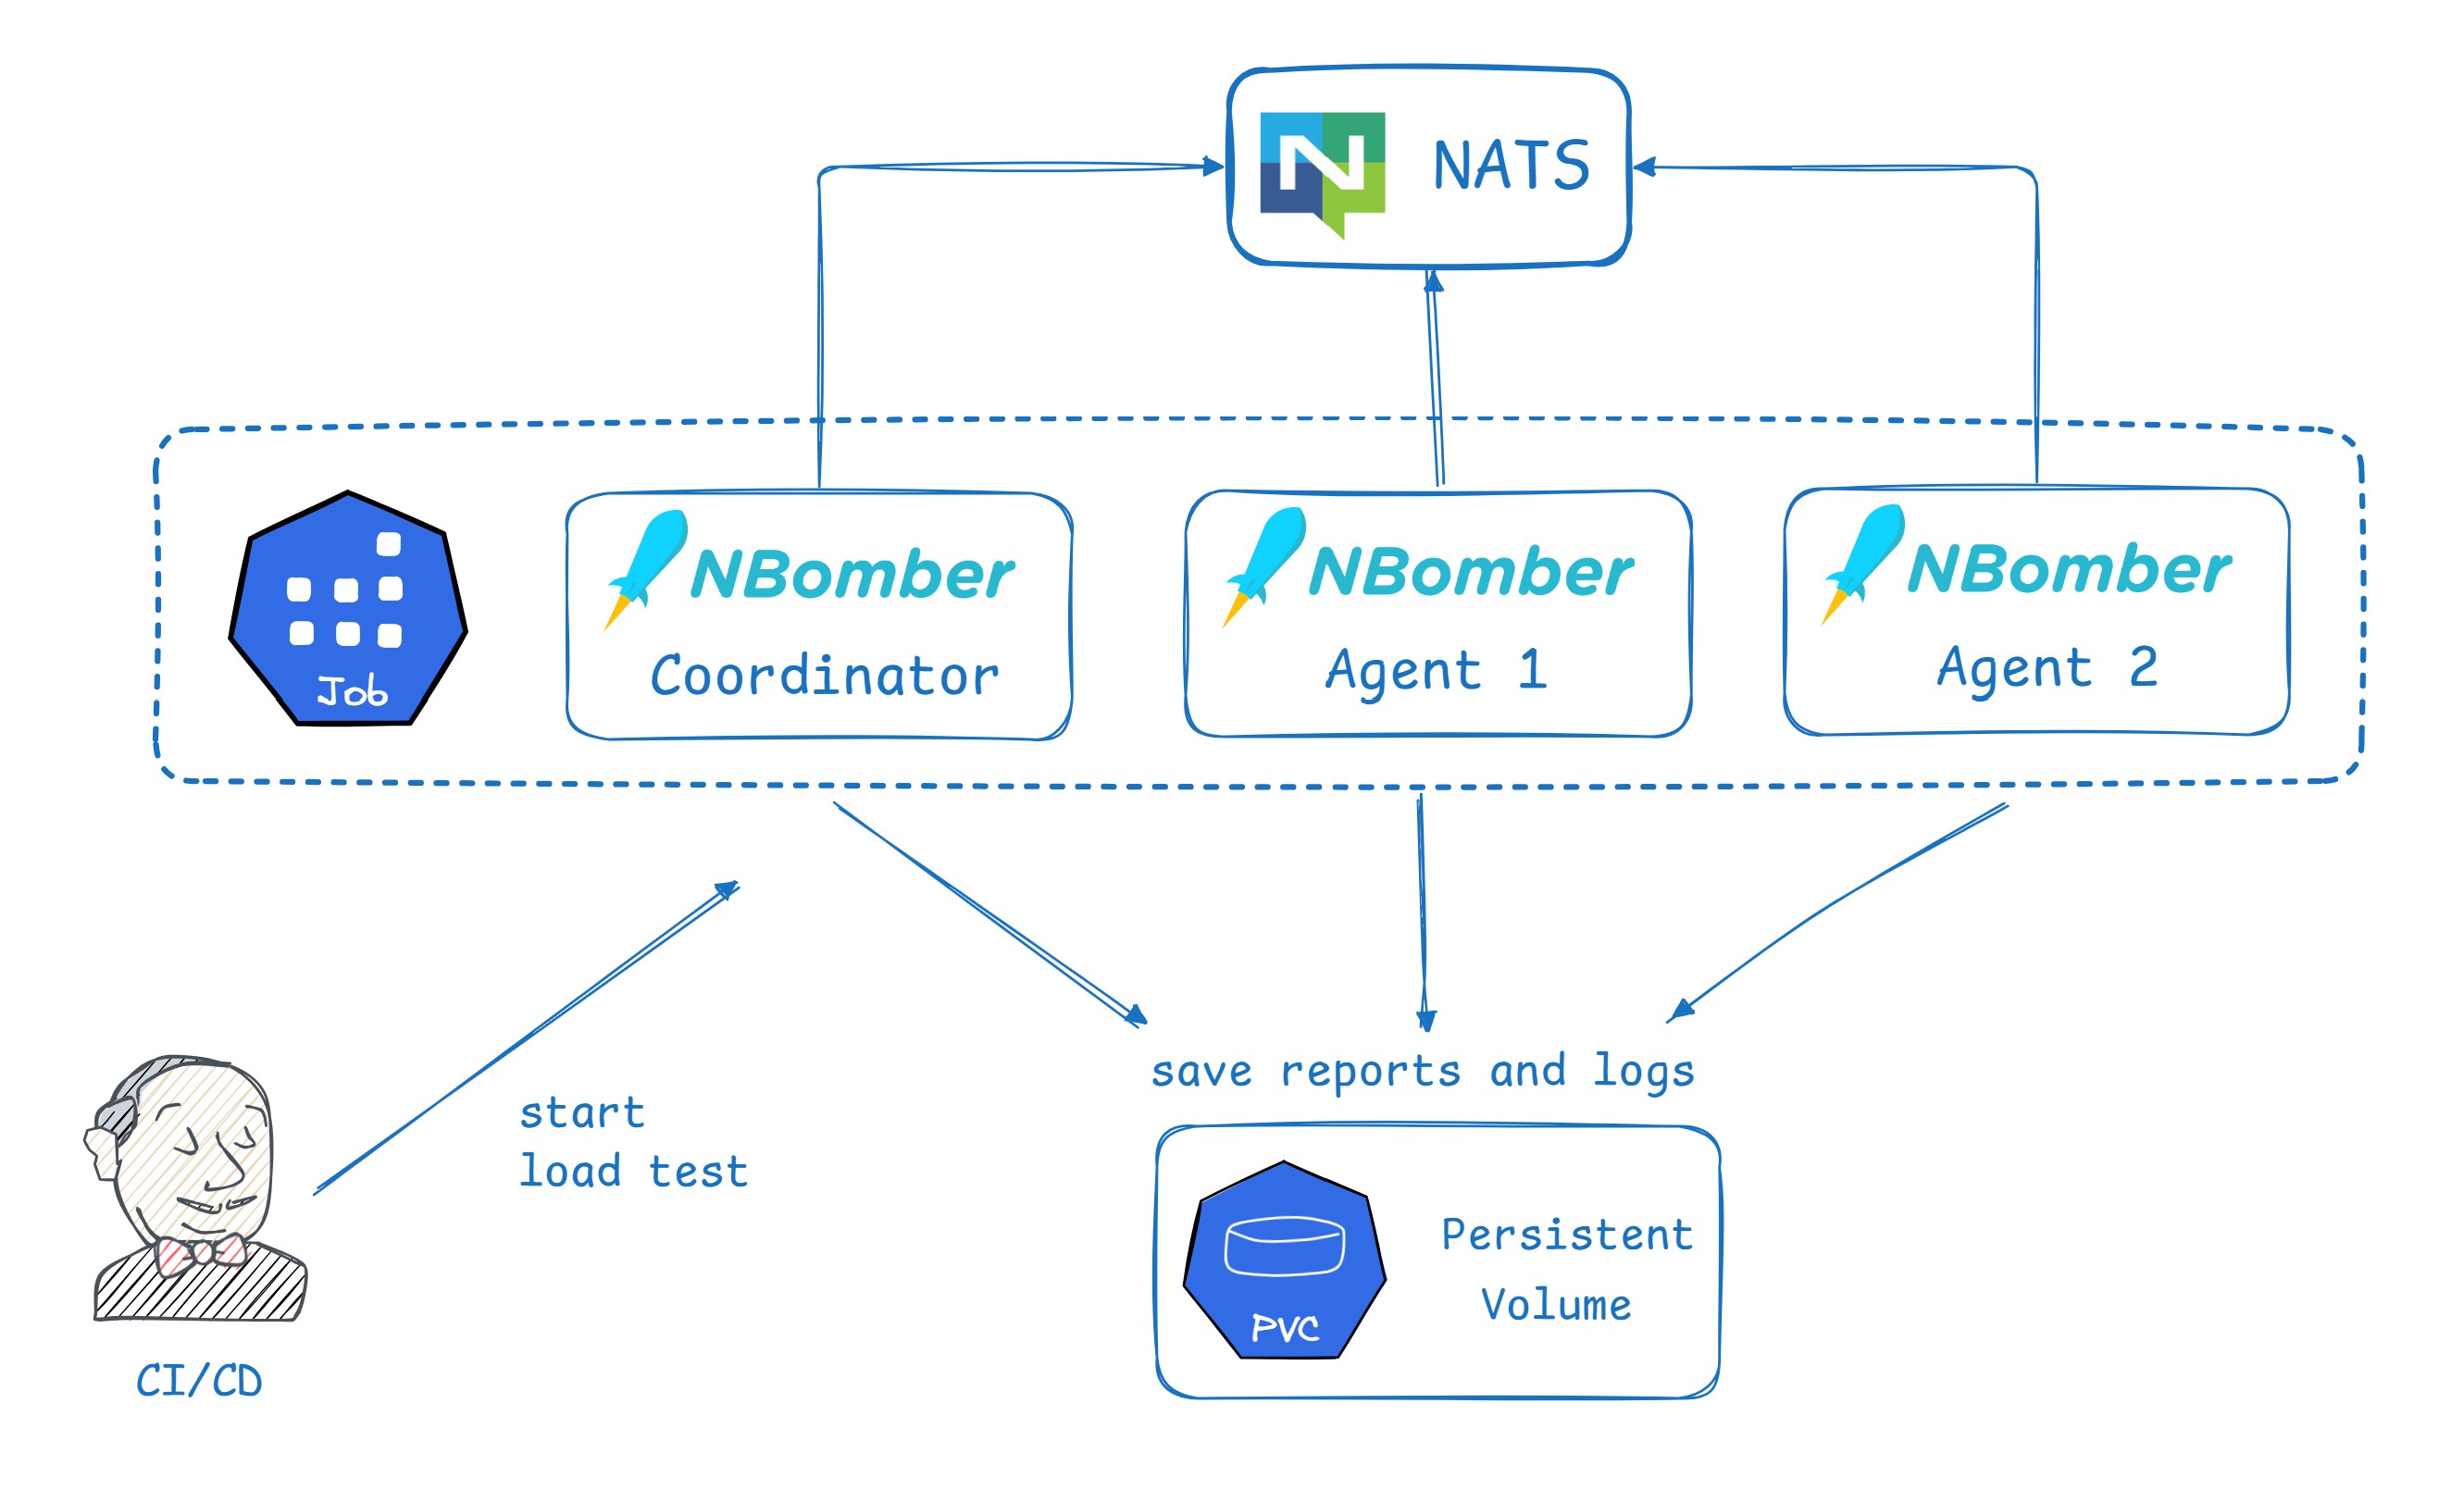
Let's now try to run the same K8sDemo project but in Cluster mode. Cluster Mode allows you to run multiple NBomber Pods in parallel, unify them into a single cluster, aggregate metrics from all nodes, perform threshold checks on the combined metrics, generate a merged HTML report, partition the data between Pods, and more.
As you may know, NBomber Cluster mode requires an Enterprise license to run your tests in a clustered setup. However, it is also possible to run a limited version of cluster mode without a license key. For this purpose, NBomber provides a special lightweight mode called - Local Dev Cluster.
The Local Dev Cluster provides the full set of cluster features, with the limitation that the cluster cannot contain more than three Pods (1 Coordinator and 2 Agents) and that each test run auto-stops after 1 minute. This mode is particularly useful for developers who want to test scenarios in a clustered environment (even locally) without having to manage license keys. With an Enterprise license, you can create a cluster with an unlimited number of Agents (1 Coordinator + N Agents) and no time limit.
To form a minimal NBomber Cluster, you need to run at least 2 Pods: 1 Coordinator and 1 Agent.
NBomber Cluster depends on NATS message broker, which is required for communication between NBomber Pods. In the following example, we will show how to install NATS for a test session and remove it afterward.
1. ConfigMap and NBomber ClusterSettings
The great thing about running NBomber tests in cluster mode is that you don’t need to change anything in your test — just extend the JSON config with the ClusterSettings.
Let's look at our updated ConfigMap, which contains the JSON Config with ClusterSettings. In these settings, we specify the configuration for Coordiantor Pod and for one Agent (AgentsCount: 1).
apiVersion: v1
kind: ConfigMap
metadata:
    name: k8sdemo-config
    namespace: nbomber-tests
data:
    nb-config.json: |
        {
            "TestSuite": "my-test-suite",
            "TestName": "k8sdemo",

            "ClusterSettings": {

                "AutoCluster": {

                    "ClusterId": "k8sdemo",
                    "NATSServerURL": "nats://k8sdemo-nats",

                    "Coordinator": {
                        "TargetScenarios": ["my_scenario"]
                    },

                    "Agent": {
                        "TargetScenarios": ["my_scenario"],
                        "AgentsCount": 1
                    }
                }
            },

            "GlobalSettings": {
                ...
            }
        }
2. K8s Job to launch NBomber Pods
To form the NBomber Cluster, we need to run multiple K8sDemo Pods. Previously, we used a single Pod for the K8sDemo test, but for the cluster setup, we will use a Job to create and manage multiple Pods.
The Job will launch two containers (Coordinator and Agent) running the K8sDemo load test. If you have an Enterprise license, you can create unlimited number of NBomber Agents in the cluster.
apiVersion: batch/v1
kind: Job
metadata:
  name: k8sdemo-job
  namespace: nbomber-tests
spec:
  completions: 2 # since we use `Local Dev Cluster` we set up only 2 Pods (1 Coordinator + 1 Agent)
  parallelism: 2
  template:
    spec:
      containers:
        - name: k8sdemo
          image: 'nbomberdocker/k8sdemo:latest'
          args:
            - '--config'
            - /config/nb-config.json

            # we use it to enable Local Dev Cluster
            - '--cluster-local-dev'
            - 'true'

            # if you have an Enterprise license key, you can provide it here.
            # - '--license'
            # - 'YOUR_LICENSE_KEY'
          volumeMounts:
            - name: k8sdemo-config-volume
              mountPath: /config
              readOnly: true
            - name: k8sdemo-pvc-volume
              mountPath: /app/my_reports
      restartPolicy: Never
      volumes:
        - name: k8sdemo-config-volume
          configMap:
            name: k8sdemo-config
        - name: k8sdemo-pvc-volume
          persistentVolumeClaim:
            claimName: k8sdemo-pvc
3. Install NATS
We now have a Job that will create 2 NBomber Pods (forming a minimal cluster) and a ConfigMap containing the ClusterSettings for the NBomber Cluster. The remaining component is NATS, so we need to temporarily spin up a NATS message broker for this test session.
apiVersion: apps/v1
kind: Deployment
metadata:
  namespace: nbomber-tests
  name: k8sdemo-nats
  labels:
    app: nats
spec:
  replicas: 1
  selector:
    matchLabels:
      app: nats
  template:
    metadata:
      labels:
        app: nats
    spec:
      containers:
        - name: nats
          image: 'nats:2.9.9'
          args:
            - '--js'
          ports:
            - containerPort: 4222

---

apiVersion: v1
kind: Service
metadata:
  namespace: nbomber-tests
  name: k8sdemo-nats
  labels:
    app: nats
spec:
  selector:
    app: nats
  ports:
    - port: 4222
  type: ClusterIP
Our NATS broker will be available at the address: nats://k8sdemo-nats, and this is exactly how we configured the NBomber ClusterSettings in the ConfigMap:
{
    "AutoCluster": {

        "ClusterId": "k8sdemo",
        "NATSServerURL": "nats://k8sdemo-nats"

        ...
    }
}
4. PersistentVolume for reports and logs
As in previous example we will use PersistentVolume for storing NBomber reports and file logs.
apiVersion: v1
kind: PersistentVolumeClaim
metadata:
  name: k8sdemo-pvc
  namespace: nbomber-tests
spec:
  accessModes:
    - ReadWriteOnce
  resources:
    requests:
      storage: 100Mi
5. Start Load Test
Now, let’s apply k8sdemo-cluster.yaml manifest:
kubectl apply -f k8sdemo-cluster.yaml
The k8sdemo Job should now be created, and the load test should start. We can wait on Job compleation via command:
kubectl wait --for=condition=complete job/k8sdemo-job -n nbomber-tests --timeout=300s
6. Extract reports and logs
Once the Job status changes to Complete (indicating that the test has finished), we can copy the reports from the /app/my_reports folder.
The report folder path shown above was configured in the JSON config, which we provided via the ConfigMap.
{
    "ReportFileName": "my_report_name",
    "ReportFolder": "my_reports"
}
Since the NBomber Pods have already terminated, we can’t connect to them via shell to copy the reports directly.
The standard approach in this case is to temporarily run an additional empty Pod and attach to it the same PersistentVolume that was previously mounted to the NBomber Pods. This allows us to copy the reports from the temporary Pod.
For this, we created an additional k8sdemo-reports-pod that defines an empty Pod with the PersistentVolume attached. Let’s apply it:
kubectl apply -f k8sdemo-reports-pod.yaml
Afterward, we can connect to the newly created k8sdemo-reports-pod and copy the reports from it:
kubectl cp nbomber-tests/k8sdemo-reports-pod:/app/my_reports ./collected_reports
7. Clean up resources
Finally, don’t forget to clean up the resources:
kubectl delete -f k8sdemo-reports-pod.yaml
kubectl delete -f k8sdemo-cluster.yaml